
In recent years, nail polish application has become a popular beauty trend among individuals seeking to enhance the appearance of their hands and feet. The process involves applying colored lacquer to the nails, offering endless possibilities for creativity and self-expression. However, achieving a flawless manicure or pedicure requires precision and skill that can be best provided by professionals at beauty and hair salons. This article aims to provide valuable tips and guidelines for salon technicians in order to ensure optimal results during nail polish application sessions.
Consider the hypothetical case of Sarah, a client who visits her local salon for a weekly manicure appointment. She eagerly awaits the moment when her technician will transform her chipped and dull nails into a work of art. As she watches with anticipation, she notices the meticulousness with which her technician cleanses her cuticles, files her nails into shape, and expertly applies each stroke of vibrant color onto her fingernails. Sarah is not only impressed by the final result but also appreciates the attention to detail exhibited throughout the entire process. It is instances like these that highlight the importance of acquiring proper techniques and knowledge in nail polish application for those working in beauty and hair salons.
The following paragraphs will delve deeper into various aspects related to nail polish application and provide tips and guidelines to salon technicians for achieving optimal results.
-
Preparing the nails: Before applying nail polish, it is crucial to prepare the nails properly. Start by gently removing any existing polish using a non-acetone remover. Trim and shape the nails according to the client’s preference, making sure to file them in one direction to prevent splitting or damage. Push back the cuticles using a cuticle pusher or an orangewood stick, being careful not to damage the surrounding skin.
-
Cleaning the nails: Cleanse the nails thoroughly with a gentle nail brush and warm soapy water to remove any dirt or oil residue. Dry the nails completely before proceeding with further steps.
-
Applying a base coat: A good-quality base coat is essential for creating a smooth surface and enhancing the longevity of the nail polish. Apply a thin layer of base coat evenly across each nail, avoiding contact with the cuticles or surrounding skin.
-
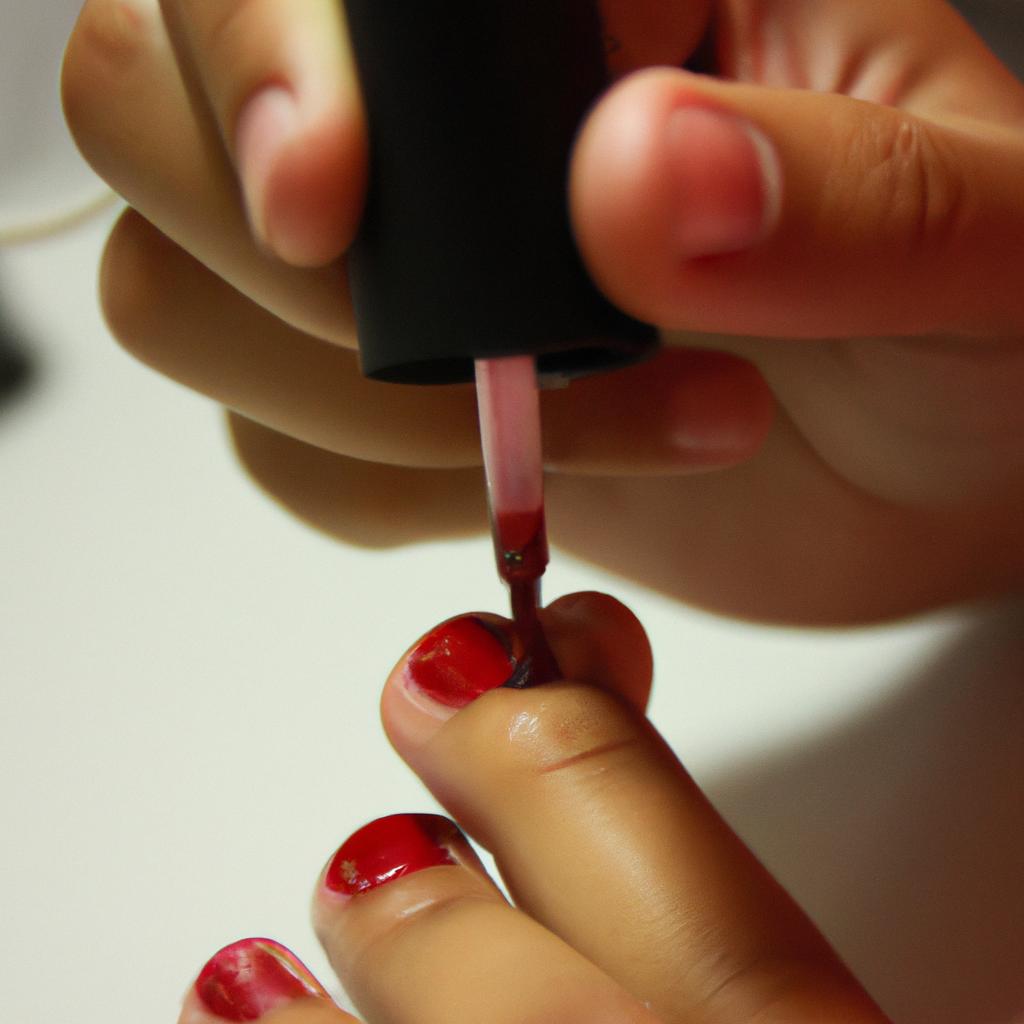
Choosing and applying nail polish: Selecting high-quality nail polishes that offer vibrant colors and long-lasting formulas is crucial for achieving optimal results. Ensure that you have a wide range of shades available to cater to diverse client preferences.
When applying nail polish, start from the center of each nail near the cuticle and smoothly stroke towards the tip in one fluid motion. Avoid painting too close to the edges or cuticles as this can lead to smudging or uneven application. For best coverage, apply two thin coats rather than one thick coat, allowing each layer to dry completely before adding another.
-
Finishing touches: Once both coats are applied, allow them sufficient time to dry completely before proceeding with additional steps such as adding designs or top coat application.
-
Adding designs (optional): Nail art has become increasingly popular among clients seeking unique and creative designs on their nails. As a technician, it is important to stay updated on current trends and techniques for incorporating various designs such as stripes, dots, or floral patterns. Use specialized nail art tools like dotting tools or thin brushes to create precise and intricate designs.
-
Applying a top coat: Finish the manicure by applying a high-quality top coat to seal in the color and add shine. This step also helps prevent chipping and extends the lifespan of the manicure. Apply the top coat evenly across each nail, making sure to cover the entire surface.
-
Drying and aftercare: Allow sufficient time for the nails to dry completely before advising clients on aftercare measures. Advise them to avoid activities that may cause damage or smudging immediately after the application, such as washing dishes without gloves or using their nails as tools. Recommend regular moisturizing of hands and cuticles with a nourishing hand cream or oil to maintain healthy-looking nails.
In conclusion, achieving flawless results during nail polish application requires attention to detail, proper technique, and knowledge of current trends. By following these tips and guidelines, salon technicians can ensure that their clients leave satisfied with beautiful and long-lasting manicures.
Preparing the nails
To achieve a flawless nail polish application, it is essential to properly prepare the nails beforehand. This process involves several steps that ensure optimal adhesion and longevity of your manicure or pedicure. Let’s consider an example: imagine you are at a high-end beauty salon getting ready for a special occasion. The technician begins by thoroughly cleansing your nails with a gentle antibacterial soap to remove any dirt or oils from the surface.
Once the nails are clean, they need to be shaped and filed according to your preference. A well-shaped nail provides a neat canvas for applying polish. Whether you prefer square, oval, or rounded tips, filing the nails in one direction helps prevent splitting and breakage. Remember to avoid sawing back and forth as this can weaken the nail structure.
After shaping, it is crucial to gently buff the surface of each nail using a soft buffer block or file. This step not only smooths out any ridges but also helps create tiny grooves that allow better adherence between the natural nail and the polish. Be careful not to over-buff, as excessive friction can thin out the nails.
Now that we have discussed these preparatory steps, let’s explore some key points through bullet points:
- Cleanse the nails using an antibacterial soap.
- Shape and file the nails in one direction.
- Gently buff the surface of each nail.
- Avoid over-buffing to prevent weakening of the nails.
Furthermore, here is a table summarizing different types of files commonly used during nail preparation:
| File Type | Description |
|---|---|
| Emery Board | Classic sandpaper-like texture suitable for all |
| nail types | |
| Glass File | Smooth glass surface ideal for sensitive nails |
| Metal File | Durable metal tool effective on thickened nails |
By following these preparations diligently, you will ensure a strong foundation for your nail polish application. With clean, shaped, and buffed nails, you are now ready to move on to the next step: choosing the right nail polish.
Transitioning seamlessly into the subsequent section about “Choosing the right nail polish,” it is essential to select a shade that complements your skin tone and suits the occasion.
Choosing the right nail polish
With nails properly prepared, let’s now move on to the next crucial step in achieving a flawless manicure or pedicure: choosing the right nail polish.
Choosing the right nail polish can greatly enhance your overall look and complement your personal style. For instance, imagine you are attending a formal event and have decided to wear an elegant black gown. To complete your sophisticated look, opting for a classic red nail polish would add that perfect touch of glamour and confidence.
When selecting a nail polish, keep these factors in mind:
-
Color selection: Nail polishes come in an array of colors, from bold and vibrant shades to subtle pastels. Consider the occasion, season, and your personal preferences when deciding which color will best suit your needs.
-
Finish options: Nail polishes also offer different finishes such as glossy, matte, shimmering, or metallic. The finish you choose can significantly alter the final outcome of your manicure or pedicure.
-
Quality and formulation: It is important to invest in high-quality nail polishes that are long-lasting and chip-resistant. Look for brands that use non-toxic ingredients and have a reputation for durability.
-
Application ease: Some nail polishes may require multiple coats to achieve desired opacity, while others provide full coverage with just one layer. Take into consideration how much time you are willing to dedicate to applying the polish and whether you prefer quick-drying formulas.
To help illustrate this decision-making process more effectively, consider the following table showcasing popular color choices along with their corresponding finishes:
| Color | Finish |
|---|---|
| Classic Red | Glossy |
| Soft Pink | Matte |
| Metallic Silver | Shimmering |
| Deep Purple | Metallic |
By carefully considering these factors and referring to examples like our table above, you can make an informed choice when selecting the ideal nail polish for your next manicure or pedicure.
Now that you have chosen the perfect nail polish, let’s move on to the next step: applying a base coat.
Applying a base coat
Having understood the significance of choosing the right nail polish, let us now delve into the importance of applying a base coat. By starting with a solid foundation, you can ensure long-lasting and chip-free nail color that enhances your overall manicure or pedicure experience.
Applying a Base Coat
To emphasize the necessity of using a base coat, consider this scenario: Imagine you’ve just spent hours carefully selecting your preferred shade of vibrant red nail polish. Excitedly, you apply it directly onto your nails without any preparation. Unfortunately, within a day or two, you notice unsightly yellow stains on your once-perfectly painted nails. This unfortunate outcome could have been easily avoided by applying a simple layer of base coat beforehand.
A quality base coat offers numerous benefits that contribute to an immaculate and professional-looking manicure or pedicure:
- Enhanced longevity: A base coat acts as a protective barrier between your natural nails and the colored polish, preventing direct contact that often leads to staining or discoloration.
- Smoother application: Applying an even layer of base coat smooths out any ridges or imperfections on the surface of your nails, providing an ideal canvas for flawless color application.
- Improved adhesion: The adhesive properties of a good base coat help bind the colored polish more securely to your nails, ensuring greater resistance against chipping and peeling.
- Nail health maintenance: Certain base coats contain ingredients such as vitamins, proteins, or oils that promote nail strength and growth while safeguarding them from potential damage caused by prolonged use of nail polishes.
Consider incorporating these tips when applying a base coat for optimal results:
| Before painting your nails, ensure they are clean and dry.
| Apply a thin layer of base coat onto each nail, starting from the center and moving towards the edges.
| Allow the base coat to dry completely before proceeding with colored polish application.
| For added protection, consider applying an extra layer of base coat on particularly weak or brittle nails.
As you familiarize yourself with the importance of utilizing a base coat in your nail care routine, it is essential to also develop proficiency in mastering the subsequent steps involved in nail polish application. By understanding and implementing proper techniques, you can achieve salon-quality results right at home.
Mastering the application technique
Building upon the foundation of a well-applied base coat, let us now delve into mastering the application technique for nail polish. By following these guidelines, you can ensure a flawless finish and long-lasting results.
Paragraph 1: To begin with, it is crucial to choose the right brush size for your desired outcome. A smaller brush allows for precision when working on narrower nails or intricate designs, while a wider brush covers larger areas more efficiently. For instance, imagine you are painting a client’s toenails in a beauty salon. Using a narrow brush would enable you to paint neatly around their cuticles and reach those hard-to-access corners effortlessly.
In addition to selecting an appropriate brush size, understanding proper polish application techniques significantly contributes to achieving professional-looking manicures and pedicures. Consider the following tips:
- Start by applying thin layers of polish rather than thick coats. This not only ensures even distribution but also reduces drying time.
- Allow each layer to dry completely before adding another coat. Patience is key here; rushing this step may lead to smudging or streaking.
- Apply the first stroke down the center of the nail, followed by strokes on either side for full coverage.
- Finish off by sealing the edges of each nail with a gentle swipe using the tip of the brush.
Paragraph 2: Let us now explore some common mistakes that should be avoided during nail polish application. The table below highlights specific pitfalls along with corresponding solutions:
| Mistake | Solution |
|---|---|
| Applying too much pressure | Use light and controlled strokes |
| Neglecting cuticle care | Gently push back cuticles before starting |
| Skipping topcoat | Seal your work with a clear topcoat |
| Rushing between coats | Allow sufficient drying time |
By being mindful of these potential missteps and their remedies, both amateurs and professionals can enhance their nail polish application skills.
Paragraph 3: In summary, mastering the technique of applying nail polish involves selecting an appropriate brush size and following proper application methods. By starting with thin layers, allowing ample drying time between coats, and sealing the edges with a topcoat, you can achieve beautiful results. Remember to avoid common mistakes such as applying excessive pressure or neglecting cuticle care. With these guidelines in mind, we can now move on to the next step – ensuring proper drying time for impeccable manicures and pedicures.
As we strive for perfection in our nail polish application process, it is essential to ensure proper drying time before moving forward.
Ensuring proper drying time
Building upon the mastery of nail polish application techniques, let us now explore the crucial aspect of ensuring proper drying time to achieve long-lasting and flawless results.
The importance of allowing sufficient drying time cannot be overstated. Imagine a scenario where a client leaves the salon with freshly painted nails but accidentally brushes them against something before they are fully dry. The result? Smudged or chipped polish that can ruin all your hard work. To avoid such mishaps, it is essential to follow these key steps:
- Patience is key: Encourage clients to have patience during the drying process by emphasizing its significance. Explain that rushing through this step may compromise the overall outcome and longevity of their manicure or pedicure.
- Use professional products: Recommend high-quality nail polishes that offer quick-drying formulas without sacrificing durability. Such products can significantly reduce waiting time for clients while delivering exceptional results.
- Utilize top coats: Advise applying a top coat after each layer of colored polish to speed up drying time and add an extra protective barrier against chips and smudges.
- Educate on post-application care: Provide clear instructions on how clients should handle their newly polished nails after leaving the salon, including avoiding activities that could jeopardize the integrity of the finish until completely dry.
To emphasize the impact of proper drying time in achieving stunning nail finishes, consider this real-life example:
Imagine you’re attending an important event later in the evening, and you decide to visit a beauty salon for a last-minute manicure. The technician swiftly applies layers of vibrant red nail polish onto your nails, assuring you it will dry quickly due to their expertise and quality products used. However, as soon as you leave the salon and reach into your purse for keys, you inadvertently brush one finger against your belongings – resulting in an unsightly smudge across your beautifully done nails.
- Frustration from smudged or chipped polish
- Disappointment after investing time and money in a manicure/pedicure
- Reduced confidence due to imperfect nails
- Potential embarrassment during important events or social gatherings
Markdown table:
| Frustration | Disappointment | Reduced Confidence | Potential Embarrassment |
|---|---|---|---|
| Smudged or chipped polish | Investing time and money in a manicure/pedicure | Imperfect nails | During important events or social gatherings |
In conclusion, ensuring proper drying time is essential for achieving long-lasting and flawless nail polish application. By educating clients on the significance of patience, recommending quality products, utilizing top coats, and providing post-application care instructions, you can help them avoid common pitfalls.
With a firm understanding of how to achieve impeccable results through proper drying time, let us now explore the crucial steps involved in adding those final finishing touches and maintaining salon-worthy nails.
Finishing touches and maintenance
Building on the importance of proper drying time, attention to finishing touches and maintenance is crucial for a flawless nail polish application. Whether it’s manicures or pedicures at beauty & hair salons, these final steps ensure long-lasting results that clients can enjoy. Let’s explore some key tips to achieve professional-looking nails.
Paragraph 1:
To begin, applying a top coat is an essential step in completing any nail polish service. A clear top coat not only adds shine but also helps protect the underlying color from chipping and fading. For example, imagine a client who has just had a beautiful red polish applied to her nails. Without a top coat, she may notice signs of wear within days due to everyday activities such as typing or washing dishes. However, by using a high-quality top coat and allowing ample drying time between layers, her manicure will remain vibrant for longer periods.
Paragraph 2:
Additionally, maintaining cuticle health is vital for overall nail appearance and longevity. Properly cared-for cuticles contribute to neatness and prevent hangnails or infections. Here are four simple practices you can incorporate into your salon routine:
- Gently push back cuticles with a wooden stick after soaking hands/feet.
- Apply cuticle oil regularly to moisturize and soften dry skin.
- Avoid cutting live tissue during trimming; instead, focus on removing dead skin only.
- Encourage clients to refrain from picking at their cuticles throughout the day.
By implementing these techniques consistently, both technicians and patrons can witness significant improvements in overall nail health.
Paragraph 3:
For visual appeal beyond the scope of the base color alone, consider incorporating nail art or decorative accents into your services. Nail stickers, gems, glitter gradients – options abound! To inspire creativity while catering to various preferences, below is a table showcasing different design ideas suitable for different occasions:
| Occasion | Design Idea | Description |
|---|---|---|
| Wedding | Lace and pearls | Delicate lace patterns with pearl accents |
| Summer vacation | Tropical palm trees | Vibrant green leaves on a sunny yellow base |
| Holiday season | Festive snowflakes | Shimmering white snowflake motifs |
| Graduation | Classy French tips | Classic, timeless French manicure style |
Including these design options in your salon’s menu can elevate the overall experience for clients, leaving them feeling pampered and satisfied.
Incorporating these finishing touches into your nail polish application routine will ensure that each client leaves your beauty & hair salon with nails they are proud to show off. By using top coats, maintaining cuticle health, and incorporating decorative elements, you can create stunning results that stand the test of time.